The engine is visible from this side.
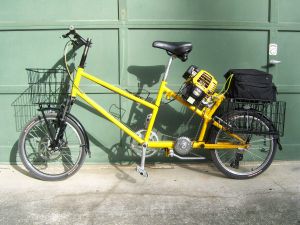
Here's the "Super Grocery Getter", an eminently useful machine that can haul three bags of groceries with ease. My goal for this bike was:
The Frame
This is the first frame I've made using a jig. Years ago, I learned a simple but effective way to build a straight frame from Joe Kochanowski. You clamp your front and rear wheels between two long, straight 2x4s or 4x4s, so that they're aligned, and leave them clamped while you build the frame. That's worked for me several times now, but after lurking on the Framebuilder's listserve I decided to build a jig and an alignment table. These worked fine and the bike can be ridden no-handed. I made a full scale drawing that I worked off of while building the frame, and fretted too much over the head angle. Clamped the fork in my repair stand at different angles and measured rake and trail. Ended up with a 73 degree head tube angle. It steers great. The tubing is a mixture of chrome-moly tubes from Nova Cycles Supply and Wicks Aircraft and Motorsports. If I built this frame again I think I could do almost the whole thing from one mountain bike frame kit from Nova, which would be lighter, but maybe not cheaper. The tubes are fillet brazed and I spent almost no time on prettying up the joints when I was done. I wanted a "step-through" frame design to make it easier to mount and dismount when it's heavily loaded. I'm used to using 20" wheels with motorized bikes because it makes gear reduction easier, but small wheels are also nice for keeping cargo weight low.
Motor and Transmission
Before making this bike I only used Honda GX series engines. The Robin Subaru engines are reputed to be better than Hondas though because they have a cast iron cylinder liner and allegedly have fewer problems. I've never had a problem with any of my Honda engines, so we'll see how this one works out. In the past I've used gear reducers with either cast or stamped gears packed in grease. They've worked well, but this time I tried using a belt-driven continuously variable transmission (CVT) that's normally used with scooters. It makes for an interesting ride. Since the motor is routed through the bike's derailleur gears, the CVT adds a whole extra effective set of gears for the motor. So you don't have to be in the right derailleur gear for the motor to be spinning at the optimal speed. The CVT lets the motor find the optimal speed. Plus it extends the low and high range of gears for the motor. The CVT is also very light, and cheap (only about $65). I've been told that they rob power due to the belt slipping, but based on my own experience, that isn't true or it isn't noticeable. My motorized folding Raleigh 20 tops out at about 30mph on flat ground and gets over 170mpg, and I suspect this bike does about the same. Will measure at some point.
Better Components I'm normally old school when it comes to hacking bikes together and have avoided indexed shifting, threadless headsets, disc brakes, etc. Well, screw that. Everyone who tries my bikes with old style shifters vs. this one with index shifters remarks on how much easier this one is to ride. The disc brake is great too.
The engine is visible from this side.

The continuously variable transmission (CVT) is visible from this side.
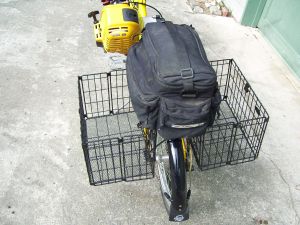
Collapsible SunLite grocery baskets. They're mounted nice and low for good stability when loaded. My one gallon gas tank is stored in the black bag.
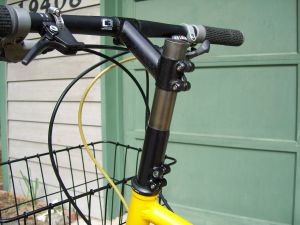
With the 20 inch wheels, a stem extension is needed for adequate handlebar height. There's a steel plate near the bottom of the extension with a hole drilled in it for an allen head bolt to tighten the stem extension to the star nut in the steerer tube. I had to make a long T-handled allen wrench to install and remove the allen bolt. When the frame was powder coated, they powder coated the bottom of the extension black.
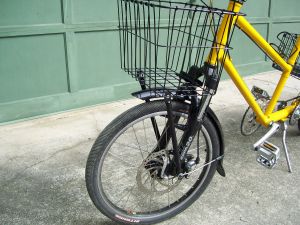
A close up of the front end. Tektro disk brake, RST fork, Shimano Deore hub, Sun CR-18 rim, Wald grocery basket. The fork spring supplied with the fork was too week, so inserted a length of plastic pipe about one inch long in the fork leg to add more preload. I made a bracket for the back of the basket to mount to the fork bridge. I couldn't use the brackets that Wald supplied because they attach to the handle bars, and the bars move in relation to the lower fork. With the bracket the basket's pretty sturdy.
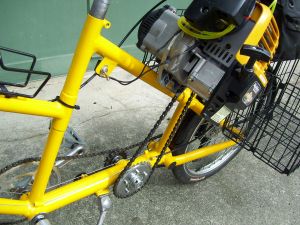
The engine is linked to the jackshaft with a 10 tooth driving cog and a 30 tooth driven cog mounted on a BMX style freewheel body. The engine and CVT aren't really centered on the main axis of the bike, but you don't notice any imbalance when riding. Note the on-off switch just in front of the engine. There are two fuel lines. One supplies gas to the engine while the other returns extra gas to the tank when the primer bulb is pumped.
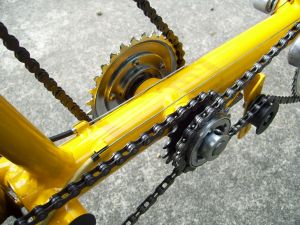
The jackshaft is made of a 5/8" keyed shaft with bearings pressed into a tube brazed laterally through the big boom tube between the bottom bracket and the rear triangle. The freewheels and cog are attached to the jackshaft with freewheel adapters from Staton Inc. By having freewheels as the driven cogs for both the engine drive chain and the pedal drive chain, the two systems are isolated. You can pedal without motoring, motor without pedaling or motor and pedal at the same time. There's no perceptible drag when pedaling without the motor on.
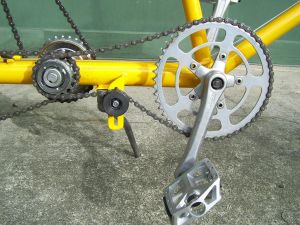
A view of the pedal drive train. Next time I might use an eccentric bottom bracket instead of an idler pulley chain tensioner. I cut a kickstand mounting bracket off a cheap bike's chainstays, brazed a nut on its top, and brazed it on the bottom of the boom tube. This required drilling a hole through the kickstand so a mounting bolt could be inserted from the bottom-up.
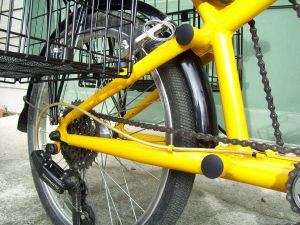
The rear triangle. I think I could simplify this next time around, but it sure is sturdy. I bought vertical dropouts with swivel-adjustable ends for the chainstays since the seatstay-chainstay angle was so small.