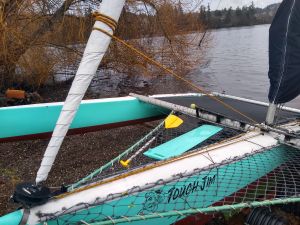
The current version of this jib system in its furled state.
Jim's home | Trimaran home | This boat's home
Self tacking system
Constructing the self tacking system
Making it furling
The current version of this jib system in its furled state.
Self tacking system - Return to top
Various people commented on the apparent difficulty of operating the jib in the video of this boat's sea trials. Indeed, it was a pain to uncleat and recleat the jib sheets when jibing and tacking. I read all about self tacking jibs and decided on using a spare main sheet traveler and car from either the Solcat 18 I had or the Supercat 20. It would work in a way similar to Harken's Crossbow system. The main challenges were, how to bend the traveler, how to mount the traveler to the boat, and how to run the control lines. Most of these changes were done before converting the jib to be furling.

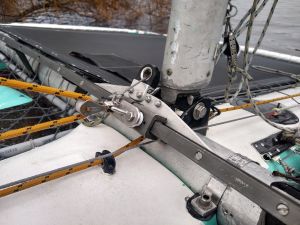
An overview showing the curved traveler attached to the crossbar (aka) with aluminum brackets and plates, painted black. The tennis balls on the end of the traveler are for safety. If you zoom in, you can see some thin yellow line go from the ball to further out on the aka. They're intended to stop lines from getting hung up on the ends of the traveler structure. So far, this has worked well, though it is a trip hazard, and you don't want to fall on it. I figure the convenience outweighs the hazards.

This shows the jib in its outermost position, and pulled tight. I hadn't riveted the black brackets to the aka yet at this point. Was just checking to see how it worked first.

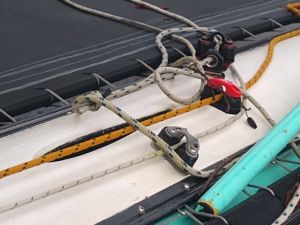
Another view showing the line (orange-yellow) that pulls the jib closer to the traveler. Once made into a furling jib it also unfurls the jib. That line is routed from the jib clew, to a block at the jib foot, then back under the base of the mast to a cleat on the deck where you sit.

View showing an early version of routing the line that pulls the car on the traveler closer to the center by the mast (white and blue). That line goes back under the mast foot to a cleat on the deck where you sit. The white and blue line has since been replaced with 1/8" Dyneema for less friction.

A view showing both jib control lines routed under the mast foot.
The current setup with 1/8" Dyneema used for furling and for controlling the car on traveler movement.
Cleats and lines for pulling the jib tight (yellow-orange), controlling the car on traveler movement (white and blue) and furling (white and gray). They don't seem to interfere with the daggerboard (slot visible in front of the red cleat.
Constructing the self tacking system - Return to top

Here's the traveler I intended to use for the jib with a drawing of the desired curve. To establish the correct curve, I measured from the jib foot back to its clew, then drew that arc using a string and a sharpie on the brown paper.

My good friend John the welder has this super cool Italian bender. He showed me how to use it. Then it was just bend some, check against the drawing, bend some more, repeat as necessary. I went a tad too far with it and had to pass it through the rollers to straighten it a hair.

Using a piece of scrap tubing, I guessed where/how the traveler should be positioned. Then built brackets from 3/16" thick 6061 aluminum riveted to aluminum square tube.

Traveler masked off in preparation for painting the brackets.

Brackets primed with special primer for aluminum.
The jib my sailmaker originally made used Wichard stainless steel hanks that clipped onto a wire head stay. Even with nonskid on the bow's deck and netting to the sides, it was challenging to get to the bow to hoist and take down the jib. I asked him about making it furl and he said "no problem". So I took lots of measurements and brought the jib to him with some new 5/32" 1x19 stainless steel wire and various bits like thimbles and swages. Indeed he made adjustments to the sail and installed the wire in the luff with the other pieces. For sun protection he applied a white, stick on fabric that's so far stayed stuck on nicely. Sure is easy to operate now, takes only seconds to furl and unfurl.

Jib furled here. I had a furling jib get destroyed by high winds on my old tri Best Guess once. It was moored at the Poulsbo marina during a winter storm. We get south winds as high as 60 mph here in the winter sometimes. It probably wasn't furled tightly, and it came loose and then got ripped to pieces. Fortunately the guys working at the marina (thank you Jonathan and Richard!) were able to tie things up so no further damage occured. Anyway, this jib's been furled in some pretty high winds and has been fine.
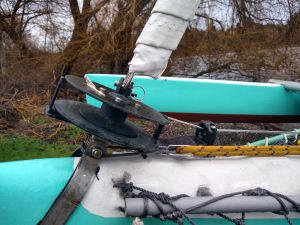
Furler and its gray Dyneema line. I got a good deal on this furler from my local new/used marine supply store Longship Marine